
Creating professional videos can take practice. Being able to edit them into something clean and professional means knowing the tricks, tips and best methods in your editing software. Whether you’re a beginner or advanced user at Premiere Pro, these seven tips are sure-fire techniques that will take your videos to the next level.
1. Use the warp stabiliser tool
The Warp Stabiliser tool can be a great way to save shaky shots. You can find it in the Effects panel. Choose Video Effects > Distort > Warp Stabilizer, and then apply the effect by dragging it to the clip on your timeline.
Premiere Pro then analyses the clip in the background and once the analysis is complete, stabilisation takes place. During these steps, you’re free to continue working on your project, but try to avoid applying to tool to too many clips at one time. The Warp Stabiliser effect can take over a minute to render depending on the footage, and analysing multiple clips can slow down the software or make it lag. It’s best to apply the effect to one or two clips at a time.
NOTE: Warp Stabiliser is not the cure-all. On some footage, the tool can end up warping the background, which creates a “jello effect”. In this case, it’s best to not use the tool at all and settle for the shaky camerawork.

2. Add transitions to your layers for quick animation
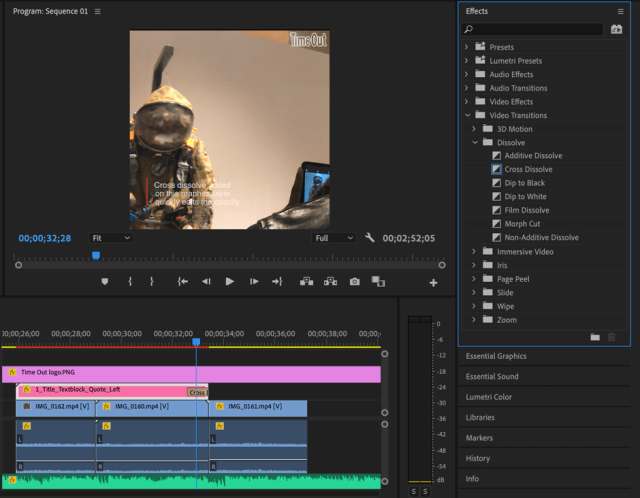
Animating your text and graphics layers can take some time. To make things easier, use the video transitions available in the Effects panel for smooth transitions. Simply pick the effect you want to use, and drag it to the beginning or end of a layer on your timeline.
You can experiment with the different transitions, but “Cross Dissolve” is recommended for its clean and professional look. This helps you skip the steps of manually animating the opacity yourself.
3. Fixing colour with the Lumetri Colour panel
Cameras don’t always pick up white levels correctly which is why we can end up with yellow-tinted footage when filming in an artificially lit room. To easily fix this and make your videos look more professional, use the Lumetri Colour effect to correct the white balance in a single click.
Access the Colour panel at the top of the screen and add the Lumetri Colour effect to a clip in your timeline. Open Effects Control for that clip and expand the Basic Correction tab, found under Lumetri Colour. Find the White Balance editor use the WB Selector eyedropper tool to select something that should be white in the frame.
You can adjust the white balance further by changing the Temperature and Tint properties by using the slider controls for fine-tuning.


Before 
After
This Adobe guide goes into more detail about how you can use the Lumetri Colour panel to make advanced colour adjustments to your videos.
4. Edit audio in Adobe Audition to reduce background hum
Even if you use decent recording equipment and microphones, it can be difficult to avoid the low background humming from things like air conditioning. To reduce this noise and bring out your desired audio more, right-click the audio clip in your Premiere Pro timeline and select “edit clip in Adobe Audition”.

Once Adobe Audition opens, you’ll be able to see the clip in the Waveform Editor. Zoom in on a quiet point and highlight a range that contains the noise you want to reduce. Make sure the range is at least half a second long. Choose Effects > Noise Reduction/Restoration > Capture Noise Print.
You should notice that the background noise is a lot quieter. Export the sound clip and import it back into Premiere Pro.
NOTE: This technique works best on consistent and simple noises. It does not work well with noises like the wind and echoes.

5. Pay attention to sound levels rather than volume
The sound output can differ depending on the devices, headphones and extensions used, so we can’t always trust our ears to gauge the ideal sound volume. Use the audio monitor located on the right side of Premiere Pro as a guide to measuring the sound levels. This is more accurate than listening to it by ear.
The audio monitor uses dB as units and is marked in multiples of six from 0, -6, -12, -16, -18 and so on. For the main piece of audio (e.g. an interview, voice-over, music) aim to have the levels somewhere between -6 and -18 dB. For audio in the background (e.g. ambient noise, background music during dialogue), a range of -30 to -48 dB is ideal.

6. Add Markers to stay organised
It can be easy to forget small details, especially if you’re working on a project that has a lot of content to work with. And a lot of the time, you only notice these small mistakes and much-needed tweaks after exporting your video.
One easy way to avoid this is by using the “markers” feature on Premiere Pro. The feature lets you add notes to your clips and timeline, creating a simple and clear to-do-list that keeps you on track.
Move the playhead to the point in your clip or timeline where you want to add a marker. Select “Marker” from the menu bar, and click “Add Marker” or press the M key. To edit the marker, double-click the marker icon in the Source Monitor to open the Marker dialogue box.
If you want to extend the marker duration and also have the comment visible, hold Option on a Mac or Alt on PC, and drag the marker icon in the Source Monitor. This helps make the marker more noticeable.
Markers have a lot of features that you can play around with. To learn what each feature does, read more on this Adobe guide.

7. Check Adobe Stock for Premiere Pro templates
If you have an Adobe account, make sure to take full advantage of Adobe Stock for templates that you can use on Premiere Pro. Animating your own graphics in After Effects can be difficult, so remember to browse Adobe Stock for animated content, many of which are free for subscription users.
Having smoothly animated titles and graphics are guaranteed to make your videos look more professional and put together.
